
Custom Chalkboard Workmats
Hey teaching friends! I know that finding inexpensive whiteboards or chalkboards can be tough. And yes, I am also aware that you can go to a home improvement store and get shower board cut into smaller sizes.
You could certainly decorate them with duct tape too.
But, here is a different take on DIY dry erase boards and chalkboards using placemats!

The materials needed are pretty simple: placemats, dry erase or chalkboard contact paper, and some washi tape. All of the items I needed I did find at my local big box/craft stores. Keep in mind that smooth vinyl placemats will work better than the woven or fabric mats for contact paper sticking power.
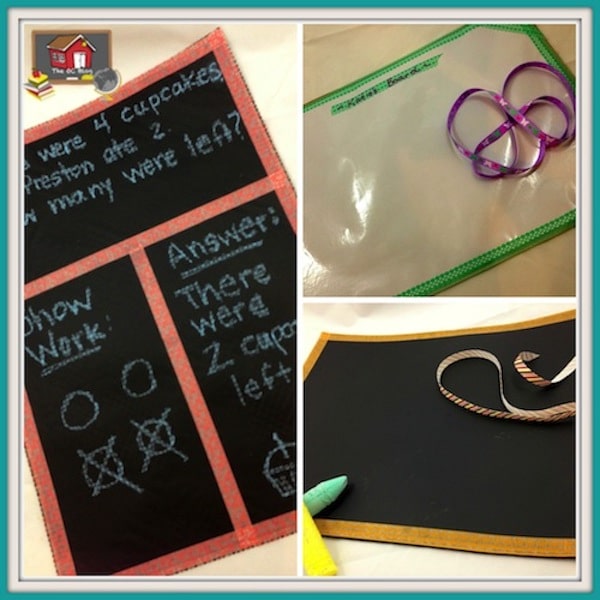
Choose your placemats and coordinating washi tape. Here are the choices I had below. Note: the ribbon is also included because my original intent was to roll them up when not in use and tie a ribbon for storing in a basket or bucket.
BUT – I tried to do that, and the contact paper did not agree with that plan. Another idea could be to hole punch the top of your mats and string ribbon through in order to hang from a peg in the classroom {I just ran out of time to do that step.}

Next up, grab your contact paper of choice and cut to the size of the placemat, leaving a small edge. Luckily the guides on the back of the paper allow you to cut straight without needing a ruler!
You might want to check out:
Need some new ideas for organizing your classroom environment? This 108 page digital book has you covered!
Includes 16 ad-free articles from Organized Classroom, including topics such as:
- Easy DIY Projects for Making Mundane Office Supplies Cute Again
- New Ways to Use Old Supplies
- A Quick Tech Tutorial that Will Save You Money on Classroom Decor
- Unique Ways to Use Binder Rings
- Student Desk Straightening Tips
…and even more!
Now available in our Shop! And the second copy to share with a friend is half price!
To apply: start with one short end by peeling back only a small amount of the paper backing. Press down firmly along that end of the mat. Then, continue pulling the paper backing from underneath a little at a time, smoothing as you make your way towards the bottom of the opposite side.

Finish up by adding a washi tape border around the edges and you are all set! You can even add a washi design on the back side, create fancy corners or name plates, or make T-chart or coordinate grid style boards. The choice is up to you!
Would you like some pre-made simple math story problems to use for your boards? I’ve got you covered!
Download below.

What could you use these custom workmats for in your classroom? We would love to hear your ideas in the comments below!
~Charity
One Comment